Thank you for checking in to see what we have been making in art!
Students in the Fall 2017 3-D Art Elective began by either choosing a masterwork to replicate or a fiber art to explore.
Modeled after apprenticeship practices, their goal was to get inside the head of a successful artist and learn through emulation of methods, materials, and techniques. Alongside this goal, most students were to create one or two independent works of art depending on the complexity of their project and if they were in 7th or 8th grade. Lastly, a course conclusion paper reflecting on what was accomplished, created, and learned.
Enjoy
Maryam
Gillian B.
Alejandro
For my masterworks piece, I attempted to recreate “Aurora” by Mark di Suvero in miniature form. I got a large board of cardboard and drew out the different shapes that make up the sculpture, then cut out the pieces with an Exacto knife. I also carved out a square as the base for the rest of the work and a small model person to use as scale. Then I hot glued the pieces together, making adjustments and cuts to make them fit together nicely. When that was all good and done, I painted over the sculpture with brown paint, the ground with green and the person with white. My version was made in an art classroom in Ann Arbor, Michigan, but the original work, consisting of 8 tons of steel, was built from 1992 to ‘93 and currently resides at the National Gallery of Art Structure Garden in Washington D.C. It also marks the change from di Suvero’s work involving things such as telephone poles and random metal rods to classic metal I-beams.
|
My independent piece, on the other hand, is a sort of jumble of red blocks across a small piece of wood, put together in an intentionally unorganized way. I made it by using a hot glue gun to stick the different red pieces together or to the board, then sprayed it with differently colored paints, but mostly blue and green. The piece is centered around chaos and randomness, mostly to emphasize the difference between the perfect square pieces making up the work, and the result that was anything but perfect. My goals were to try to see how different the end product and the things making it up could possibly be.
|
|
I feel like I greatly improved through the class in terms of artistic ability. I learned a lot about my masterwork; it’s history, the way it was originally created and more info about it. However, one thing that I still don’t know is why Mark di Suvero created it in the first place. So yeah, that’s my conclusion for this course.
Anabelle
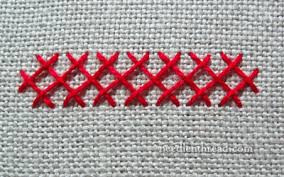
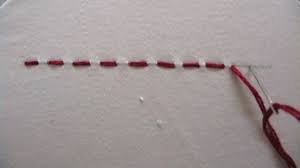
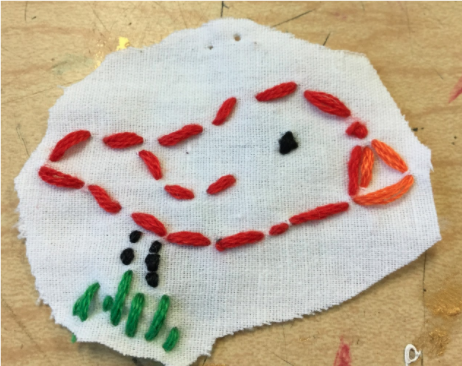
This quarter I was in 3d art. I learned how to embroider. I learned how to do the running stitch, back stitch, satin stitch. I wanted to do embroidery because it looked really fun. I did 3 pieces, 2 of which were embroidery pieces.
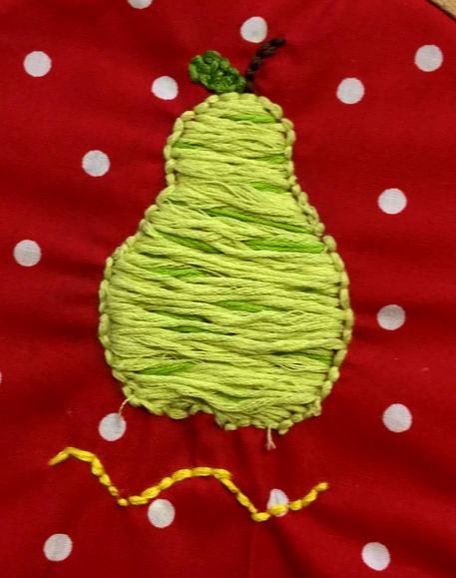
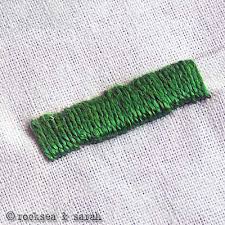
My master work was a pear. I embroidered the pear into a red fabric with white polka dots. For the outline of the pear I used back stitch and used a yellow/green color. Then for the inside of the pear I used the satin stitch, I used the same color that I used for the outline mixed with another green.
|
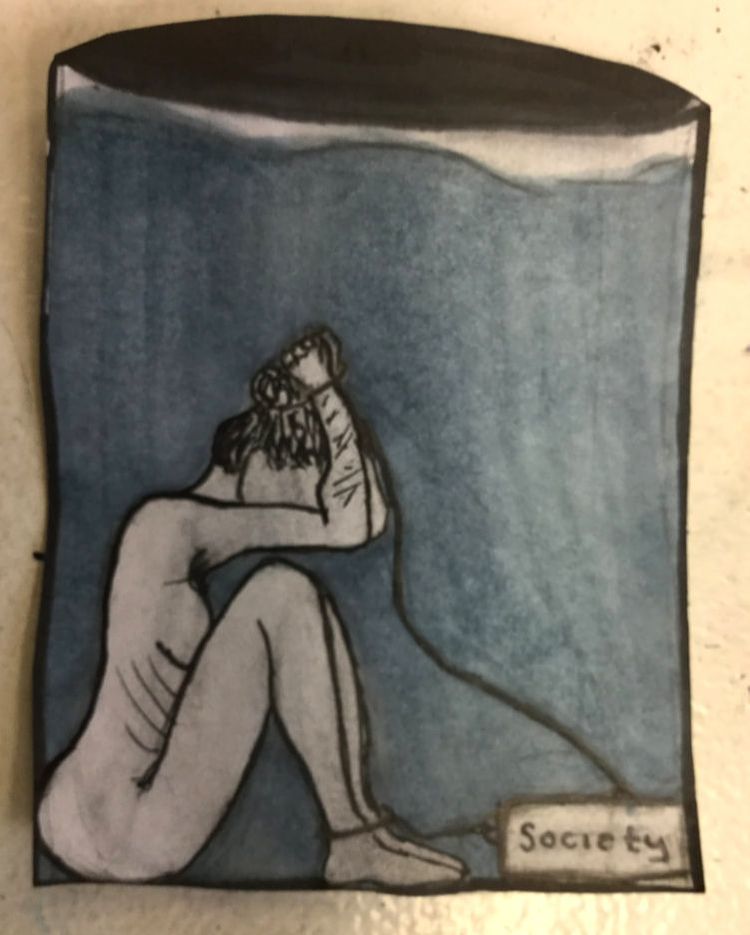
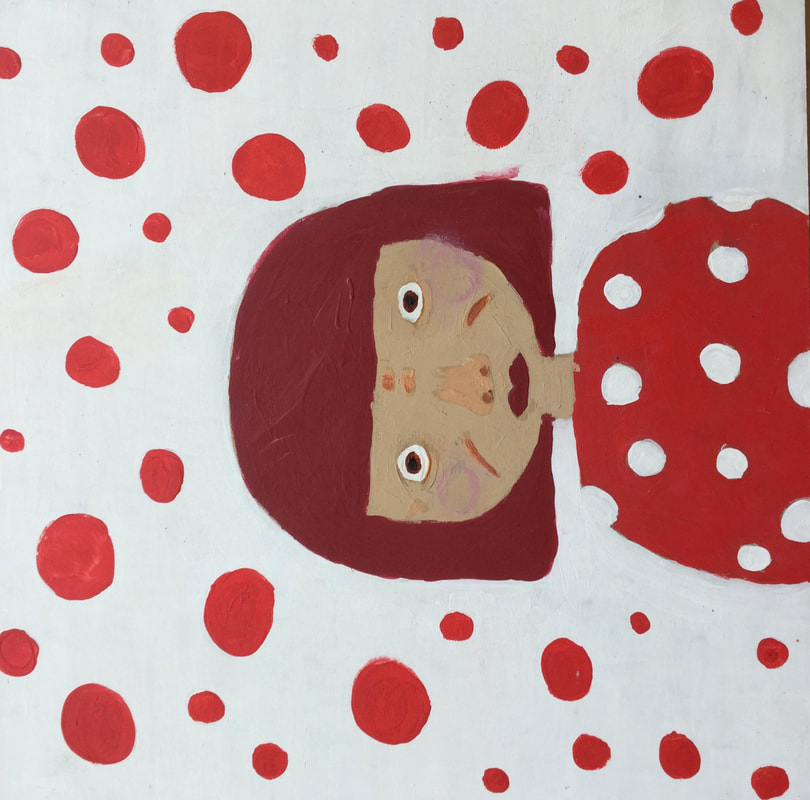
For my first independent piece, I drew a person who is underweight and has self-harm scars on her arm. The person is underwater tied to a block that's supposed to represent society. It's trying to show that society is teaching young boys and girls that they should be this "perfect" person who is skinny and pretty and if they aren't they should hate themself society is saying that if you aren't this perfect person you are "ugly". So many people starve themselves because of this.
|
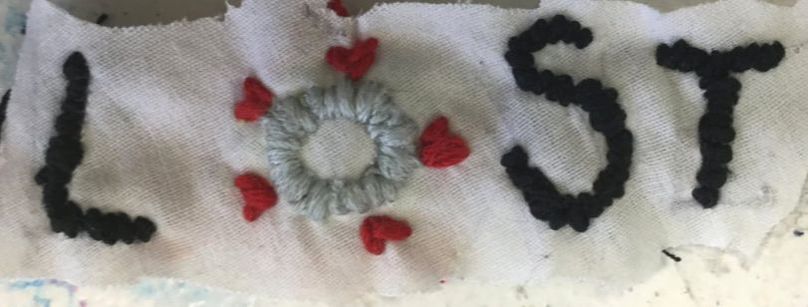
For my second independent piece I embroidered the word "lost. " into plan white fabric. Used the satin stitch for all the letters and the "o" has hearts around it.
Overall this course was pretty good. I got a lot done. I learned a lot about embroidery. I am proud of my pieces.
Anna
|
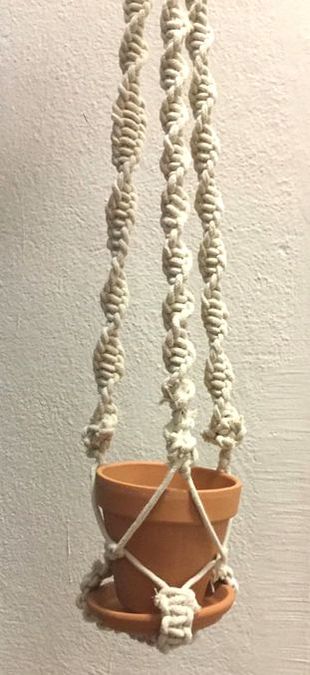
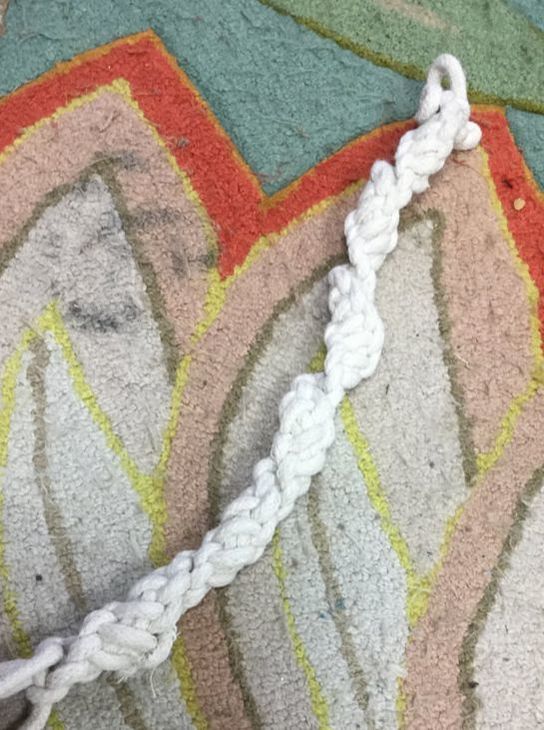
This quarter I did a study of macrame. Macrame is a fiber art where you use rope and string to make all sorts of things like wall hangings, plant hangers, necklaces, bracelets, etc. In this study I learned about the history of macrame, and I made a artwork to go with what I learned.
The most used macrame knot is the square knot. Macrame was first used in the 13th century by arab weavers. Macrame was originally used for decorative fringes. but later used for things like hammocks, belts, and dresses as the art form spread europe and china. Macrame was most popular in the victorian era when people started to use it for things like tablecloths, curtains, and bedspreads. For my art work I made a macrame plant hanger. The materials I used were rope, a plant pot, scissors, pencils, clipboards, and hot glue. To make the plant holder I started with three thick spirals at the top and a circle base and connected them. Goal was to make a plant hanger that would successfully hang a plant from the ceiling. I completed my goal and learned how to make a macrame flower and necklace. |
Ian
|
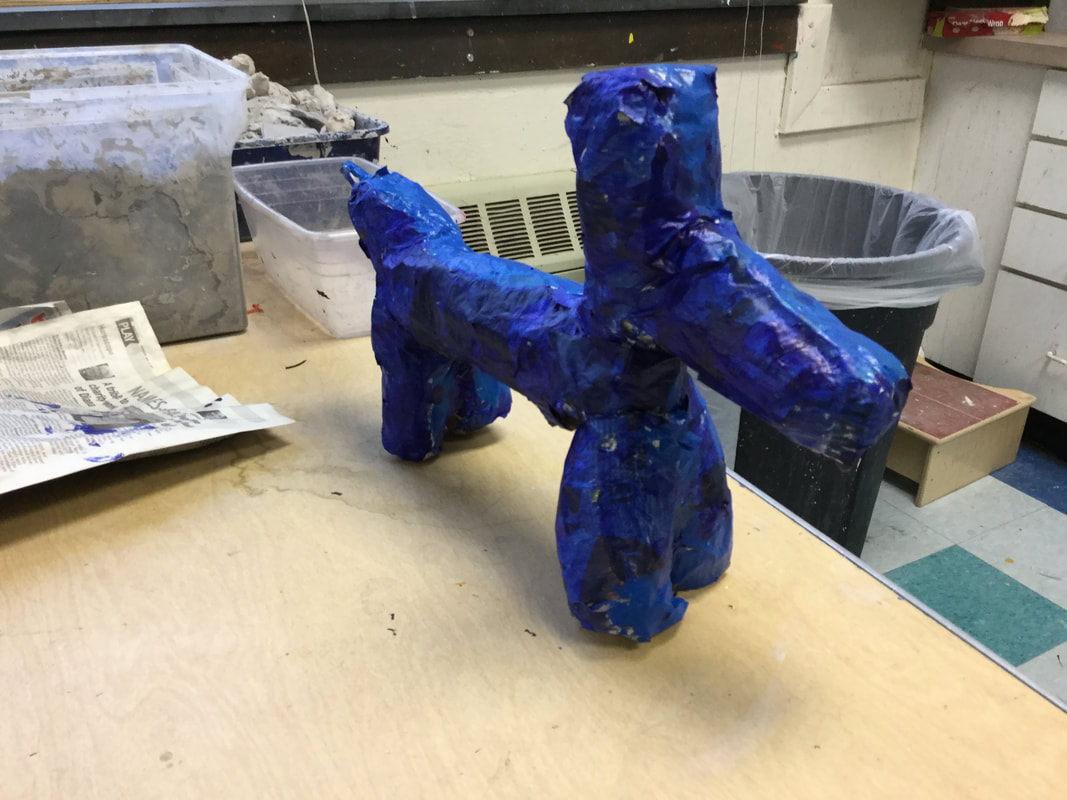
For my masterwork I worked on the blue Balloon Dog by Jeff Koons. The sculpture was not made out of balloons, it was made out of stainless steel. Jeff Koons made 5 balloon dogs. He made ones in colors of magenta, orange, red, yellow and I made the blue one. The dimensions of the blue balloon dog were 121 x 143 x 45 inches.
I was going to make my balloon dog by making a dog from balloons, paper macheing, then painting...but that didn’t work out. So instead I made mine by crumpling up old construction paper and taping it together. After I did that I paper mached it then painted it. Overall I think my end creation was pretty good because I don’t usually work with tape and crumpled up paper. I did two layers of paper mache in some spots and I only did one in others. In the picture that I used for making the balloon dog there were reflections on the dog, so I actually made the the reflections from the picture onto my dog. If I could go back from the start again I would never have used balloons to make it, I would’ve just gone straight into the paper technique so I could’ve had more time on it. I learned that balloon animals are not good to work with, because they have a high chance of popping. They should be used for short term things not long term, and if you leave them in lockers overnight they will either shrink or pop. |
Suri
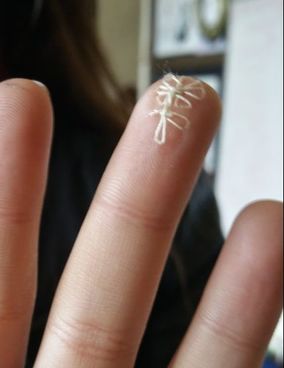
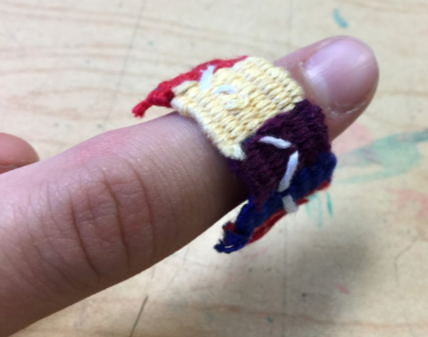
For this 3D art class, I did a study of embroidery. Embroidery is what’s called a “handcraft” that involves stitching yarn or, more commonly, thread onto materials such as fabric. I like embroidery because it’s somewhat of an optical illusion in the way that if you look at it from far away, it seems like one big picture but if you look at it closer, you can spot each individual stitch that makes up this big picture. There was also the added benefit that I’ve been doing some sort of embroidery since I was like, six. Of course, like any art form, people have found unconventional ways to utilize it. Paper has been embroidered, beads and sequins have been sewn in, people have embroidered their own skin, etc. There are so many cool ways that embroidery can be implemented but for my study, I chose the most basic to, per se, dip my toe into the water. That aside, I did try the hand embroidering at one point and decorated the pad of my middle finger with a ‘lil dainty flower.
Embroidery, like many things, started out as a purely functional art form. Stitches were first used to make clothing stay together, and only later did people realize you could decorate the clothing in the same fashion. The practice of sewing things together dates as far back as functional clothing, but embroidery, as it's own art form, emerged a bit later, closer to 500 BC. Embroidery is an extremely traditional art form as it has barely changed since its first invention. Well, had, since the invention of a machine that can do the embroidery in a tenth of the time a person can, you can find embroidered things everywhere for a cheaper price. Think shirts, skirts, jeans, headbands, if there is a spot on a piece of clothing that can be embroidered it’s probably sitting in the back of Justice at the mall. But, all that aside, the practice of hand-embroidering is still almost identical in procedure and result as it was hundreds of years ago.
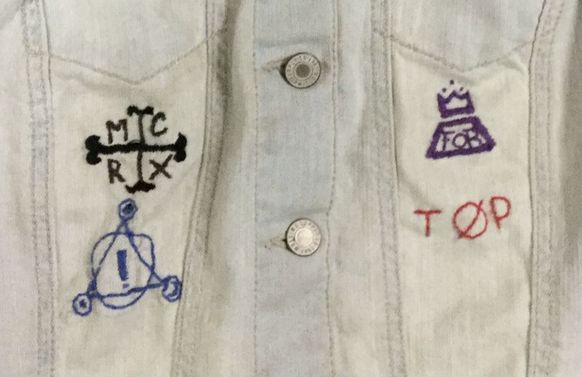
I chose to showcase my study by embroidering on a denim vest. I chose four different band logos and embroidered them down the front panels of the vest. The first is a symbol for the band My Chemical Romance, it's the + with details on the ends and the letters M, C, R, and X. This one was haaaard because it was the first thing I've embroidered in many years. The second is tøp which stands for twenty øne piløts, this one was easier because it was mostly straight lines and I used backstitch instead of satin stitch. The third “patch” if you will, is the purple one that says FOB. That’s the logo for the band Fall Out Boy. This one came with a method that may or may not have a name (I figured it out by myself, woot) for embroidering in straight lines. For the last one, I forgot that uhm, spacing your mini pieces out before you embroider them will generally make the work fit better so it did end up a little crowded. Oops. The last one is the blue combination of circles and triangles. It’s one of the many Panic! At The Disco logos.
Embroidery, like many things, started out as a purely functional art form. Stitches were first used to make clothing stay together, and only later did people realize you could decorate the clothing in the same fashion. The practice of sewing things together dates as far back as functional clothing, but embroidery, as it's own art form, emerged a bit later, closer to 500 BC. Embroidery is an extremely traditional art form as it has barely changed since its first invention. Well, had, since the invention of a machine that can do the embroidery in a tenth of the time a person can, you can find embroidered things everywhere for a cheaper price. Think shirts, skirts, jeans, headbands, if there is a spot on a piece of clothing that can be embroidered it’s probably sitting in the back of Justice at the mall. But, all that aside, the practice of hand-embroidering is still almost identical in procedure and result as it was hundreds of years ago.
I chose to showcase my study by embroidering on a denim vest. I chose four different band logos and embroidered them down the front panels of the vest. The first is a symbol for the band My Chemical Romance, it's the + with details on the ends and the letters M, C, R, and X. This one was haaaard because it was the first thing I've embroidered in many years. The second is tøp which stands for twenty øne piløts, this one was easier because it was mostly straight lines and I used backstitch instead of satin stitch. The third “patch” if you will, is the purple one that says FOB. That’s the logo for the band Fall Out Boy. This one came with a method that may or may not have a name (I figured it out by myself, woot) for embroidering in straight lines. For the last one, I forgot that uhm, spacing your mini pieces out before you embroider them will generally make the work fit better so it did end up a little crowded. Oops. The last one is the blue combination of circles and triangles. It’s one of the many Panic! At The Disco logos.
Planning was a crucial step I completely missed. The vest started as an experiment to see if I could blow dry non-waterproof pen up a piece of fabric and ended up as an art study so there are plenty of things I learned along the way. 1) Don't think too big, I started this nine week class with the delusional idea that I would somehow create my own fashion show by mixing procrastination and thread, yeah not gonna happen, 2) Needles are a very good tool to have if you plan on embroidering, 3) Role models are a plus, find someone that does what you’re trying to accomplish but is doing much better and figure out how they didn’t fail, proceed to implement that on yourself, 4) DO NOT, I repeat, do not, get acrylic paint in your hair, that stuff turns into plastic when it dries, 5) Knowing things such as the names of stitches is a helpful tool if you feel the need to converse about your art and use terms other than “the straight uppy-downy one”, and 6) PLAN OUT YOUR TIME!! I was like “Oh, nine weeks, I’ll have time to finish one piece a week pshh” and ended at “Nine weeks?! Nine weeks and we’re supposed to have an art piece and a paper?! What?!” This piece, in particular, will stick with me and heavily affect pieces in the future because it would’ve looked so much nicer had I just planned my artwork, planned my time, and gathered the materials I needed beforehand. Doing the last essay on time would’ve been a step in the right direction though. To conclude, oops.
Noa
I have done knitting as my masterwork and finger knitting as my smaller project. I have used the nine weeks we’ve had to multiple finger knitting projects as well as used time at home to complete work.
|
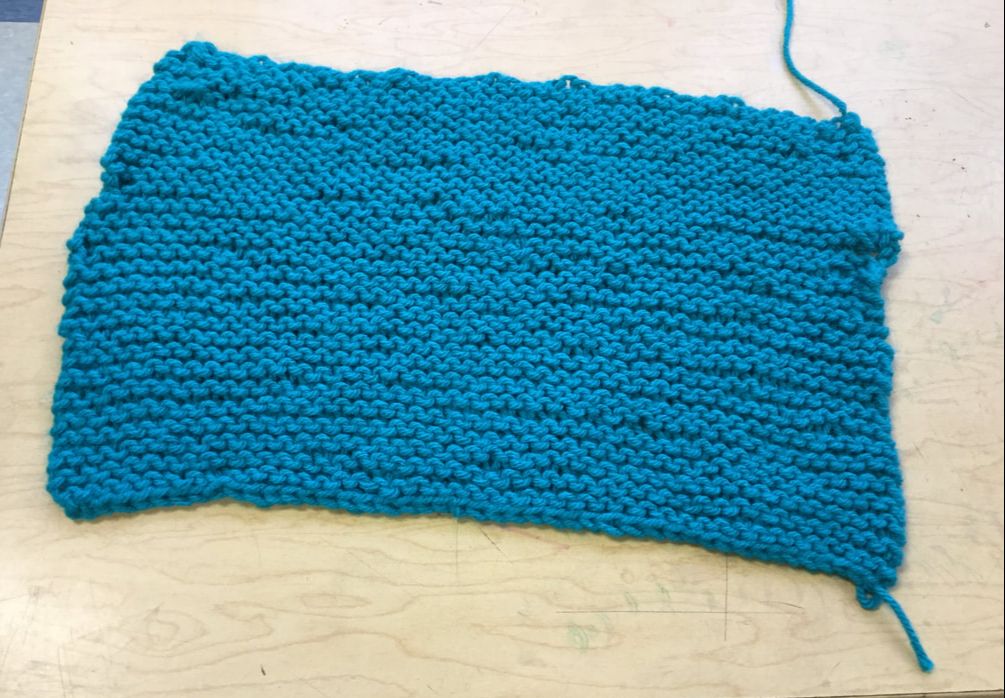
My art looks like a square and has lines. I created it by using yarn and knitting needles. The big idea is to express yourself. To learn how to get better and how to start and end it. I like it. I think it turned out well for my first time starting and ending a project.
I choose to do art because I like expressing myself. I also want to get better at different kinds of art and the only way to do that is to do art in general. I also like working my way up to the end product and seeing how well I think I did |
The idea of knitting began in the middle east. Europe through the mediterranean trading routes. Then to the Americas. The oldest found knitting was in Egypt and date back between 11 and 14th centuries AD. Spanish Christen royal families employed Muslim knitters. There work is the earliest knitted items in Europe. The made cushion covers and gloves. Knitting spread throughout Europe in the 14th century and spread to Britain in the 16th century and the Scottish Isles in the 17th and 18th centuries. Families would knit sweaters for people like fishermen. Over time they started making different designs. After the civil war people fled to China and showed them how to knit.
I think that this quarter went well for me. I was able to get a lot done with the time given. My projects in my opinion turned out really well and I did my best.
I think that this quarter went well for me. I was able to get a lot done with the time given. My projects in my opinion turned out really well and I did my best.
Chase
|
I generally do not consider my to be good at physical art. Being put here offered me a chance to improve I did a little.
For my masterwork recreation I picked The Five Swords by Alexander Calder. It was made in 1976. The biggest challenge when is was making it was correctly traslate the curves and proportion on to paper. Painting the sculpture was easy. Assembling to cut out pieces was difficult because the cut-outs were not proportioned correctly. Alexander Calder died on November 11, 1976. He is know for making a type of sculpture called a mobile that moves and balances. |
|
I did not produce any independent pieces.
In conclusion I learned it is hard to recreate sculptures. I don't know if my drawing abilities improved, but got better at cutting the shapes out of the cardboard.
In conclusion I learned it is hard to recreate sculptures. I don't know if my drawing abilities improved, but got better at cutting the shapes out of the cardboard.
Eliahna
Billie
|
In this quarter I explored working with two different forms of fiber art, yarn bombing and embroidery. This focus was important, because, throughout history, fiber arts have been seen as a very feminine category, but as we move through our contemporary era, that is not the case.
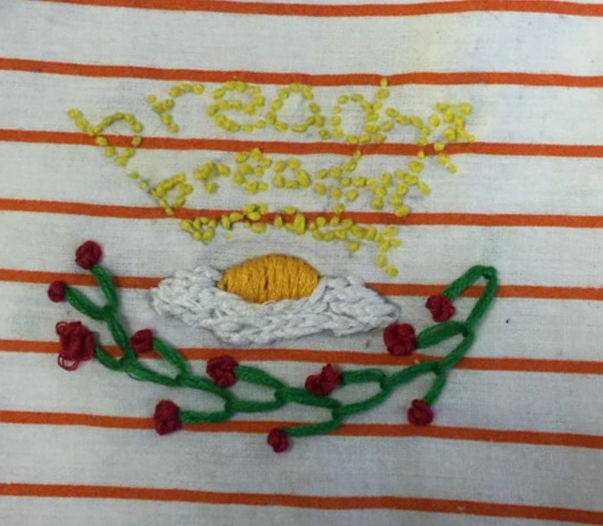
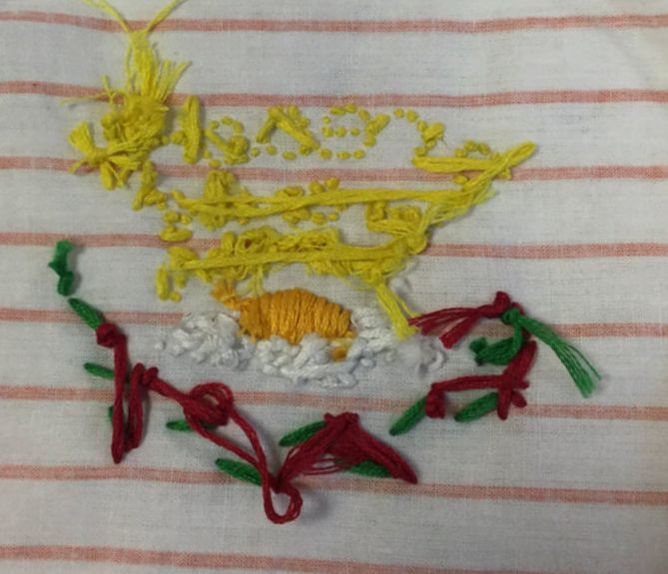
Yarn bombing is one of the most legal forms of graffiti, considered non-permanent, although it can be surprisingly durable. People have been using yarn bombing since the early 2000’s as a way of making lifeless public places more inviting--and ultimately--our own. This personalization of common spaces is thought to have originated in Texas as an imaginative way of using leftover and unfinished knitting projects, but has since spread worldwide. For my independent study I embroidered a fried egg with a rich, almost orange, yolk onto a red and white striped fabric. ‘Breadn’t’--a word that I woke up one morning to, written on the back of my hand--radiates outward from the egg in a dandelion yellow, increasing in size each of the three times it is inscribed. Beneath the egg is a stitched, basil green vine, bearing scarlet flowers. This work represents a small collection of things that I find comfort in, and as so I have titled it “everything is fine.” Coming into this project having no knowledge of embroidery whatsoever, I spent a few classes learning basic stitches and sewing them into my art notebook. The piece turned out more or less how I expected, and I found that embroidery is an extremely fun and relaxing form of art. I definitely plan on working with it in the future. As I worked on and concluded these projects I have come to understand that fiber arts do not have to only be a feminine art form. It can be transformed by men--as well as women--into a kind of art that represents something else. This is shown perfectly in works by artist such as Eliza Bennett and David Cata--both of whom used embroidery to sew images into the top layer of skin on their palms--giving their art a different and deeper meaning. |
Alice
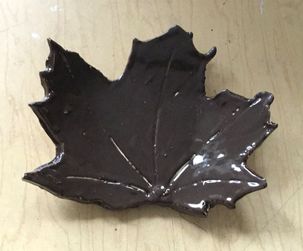
I have always loved working with clay.
I started working with clay when I was around 3 years old, when I made a girl on a horse in Russian school from regular clay.
When I got older, my mom started teaching me how to work with modeling clay.
She had taught herself when she was a kid.
A few years later one of our friends suggested polymer clay and we still use it to this day.
I love working with clay and am a big fan of Greek and Roman mythology and history.

For my masterwork I made a recreation of Nike of Samothrace ( also referred to as “ Winged victory.”). The statue is of the Greek goddess of victory- Nike. The statue was created to honor the goddess and in honor of a sea battle. The winged goddess stood on the prow of the ship ready to take flight. It was created around the 2nd century B.C but was discovered in 1863 on the island of Samothrace.The creator of the artwork is unknown. The statue is made from Parian Marble and is 224cm (96in) tall. It is located on a set of steps in the Louvre( Fact: I have actually seen the statue in real life).
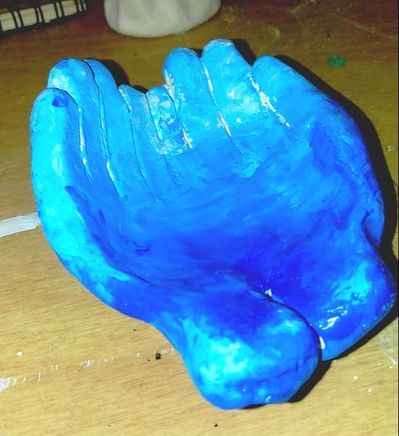
I made two hands cupped together from clay. I used clay to create the hands and different tools to create detail on the hands. I used the elements of texture form and space. I made my hands so that they could hold some soil and a small plant. I think that this could symbolize that we have the earth in our hands and if we don't take good care of it, the fragile life on earth will die. I was inspired to make this piece because because it can be used as a cute decoration. My goal is to get better at working with clay and putting time and details into my work. I think that I achieved this when making my masterwork art piece. My independent piece did not come out as well as I expected because I did not have much time and did not know how to fix the mistakes in my work.
In conclusion, I think I improved at working with clay quite a bit. I also learned about many new techniques and even got the chance to try a few. I also truly got to see how the amount of time and effort put into a piece really changes it. Another thing I learned is to have others look at your work and to examine your work from all sides because a lot of the time you don’t notice the small mistakes by yourself. If I have art as a class again this year I look forward to learning more about clay and to be able to get better at art.
Maggie
“Yarnbombing And Fingerknitting Essay”
Written on 10/30/2017
Written on 10/30/2017

|
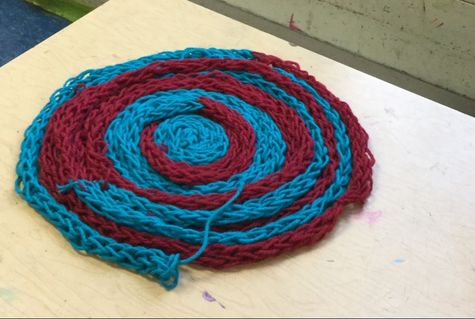
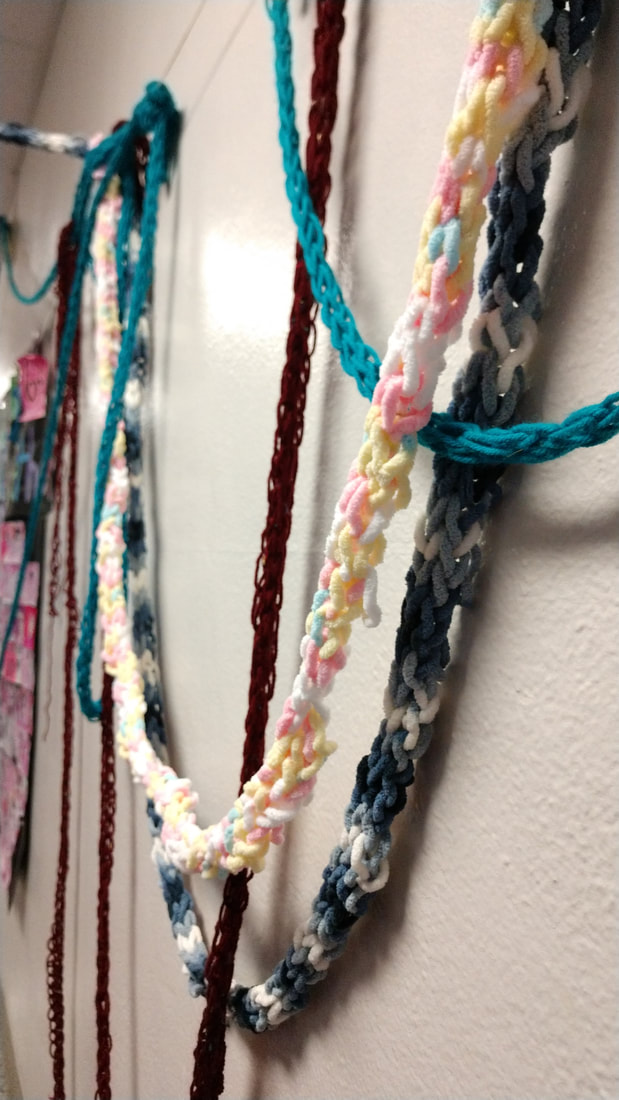
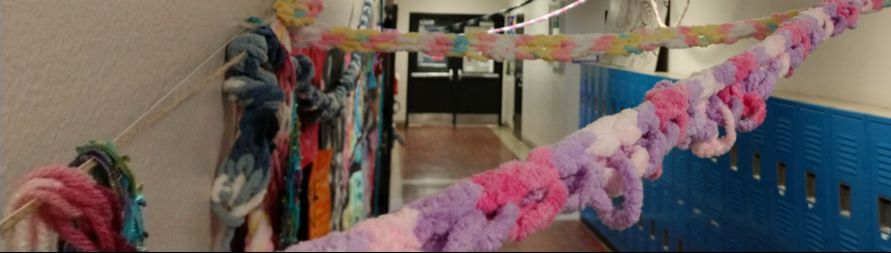
For my art projects in 3D Art class this year, I fingerknitted lots of yarn, and have “yarnbombed” part of my school. My art I have created this year consists of many colorful and long knitted strips of yarn that slightly resemble extra-long scarves. The original idea and concept of yarnbombing is to make a public area appear more friendly, colorful, and inviting. An example of public art similar to yarnbombing is Davin Zinn’s famous chalk art. Using his own creativity and imagination, David Zinn often uses features of regular public areas and transforms them into something fun and interesting. For example, a crack in a wall could be used to make the mouth of a face, a pattern in a road could be used to make the texture and pattern of a turtle’s shell, etc. Yarnbombing involves a similar concept and requires creativity not unlike Davin Zinn’s original street art.
My own original art project is to take the yarn that I fingerknitted and attach it to the wall of an empty area inside the school to make the otherwise boring space appear colorful and intriguing. It will be slightly different than traditional yarnbombing, as traditional yarnbombing is often a form of guerilla street art, and my independent art project is not officially guerilla street art. |
|
The point of my project is for students, staff members, and other people inside the school to look at and touch the artwork and for the area to appear more optimistic and inviting. Hopefully the colorful knitted yarn will make the area have a more comfortable and imaginative atmosphere. I also hope that people will enjoy touching the artwork, and possibly even contribute their own knitted art to the piece, as I have always been a fan of interactive and community-focused art.
Something that I enjoy about fingerknitting is how the only materials and tools that it requires is a ball of yarn and a hand. It is done mostly with a very simple repeating action. It is also quick and effective, especially when compared to other versions of knitting. There are, however, a few challenges with fingerknitting, such as how it requires attention and time, and a lot of un-knit yarn if you plan to fingerknit for a long period of time. Also, it is easy for the yarn to get tangled, especially if you have a lot of it. On the bright side, fingerknitting or even just knitting in general can be very calming and addicting. |
|
My goals for my art project were to fingerknit enough yarn to be able to yarnbomb something large in the school and to make the areas that I yarnbomb appear more optimistic and inspiring. I believe that I have now mostly reached these goals with my artwork. I think that this piece has helped me as an artist in general, as it has encouraged me to try new things and work harder than I usually do. My only specific goal as an artist is to create art that both me and the public can enjoy and be proud of, which I have not yet reached, but I hope to reach with my yarnbombing project. I think that this art project will help me improve as an artist, and possibly help me reach new artistic goals in the future.
I overall feel satisfied with my artwork. Although it is not yet finished nor open to the public, I think that the finished piece will turn out at least somewhat similar to how I imagined it. I learned a few things while creating this artwork. I learned that I am skilled at knitting with my fingers, but I am definitely not skilled at knitting with knitting needles. I think that this piece will likely influence my future artwork. This piece has helped me get out of my comfort zone and expand my artistic boundaries and abilities to 3D art, as I felt that I was only interested in 2D art before taking this 3D art class. I also feel that creating a 3D art project that was inspired by what originated as a form of guerilla art has helped me feel more comfortable and interested in public art and street art in general.
Julia
For my masterwork in the 3-D art class, instead of doing a masterwork, I did a study of Macrame. It is believed that macrame originated from 13th century Arab Weavers. Macrame used to be very popular in the 1970s. There are many different types of knots, some of the ones that I have learned are, the Lark’s head knot, square knot, spiral knot, and the double half hitch knot. Though the whole Macrame craze faded away, it’s making a comeback with necklaces, bracelets, and anklets. They are mostly being made from square knots.
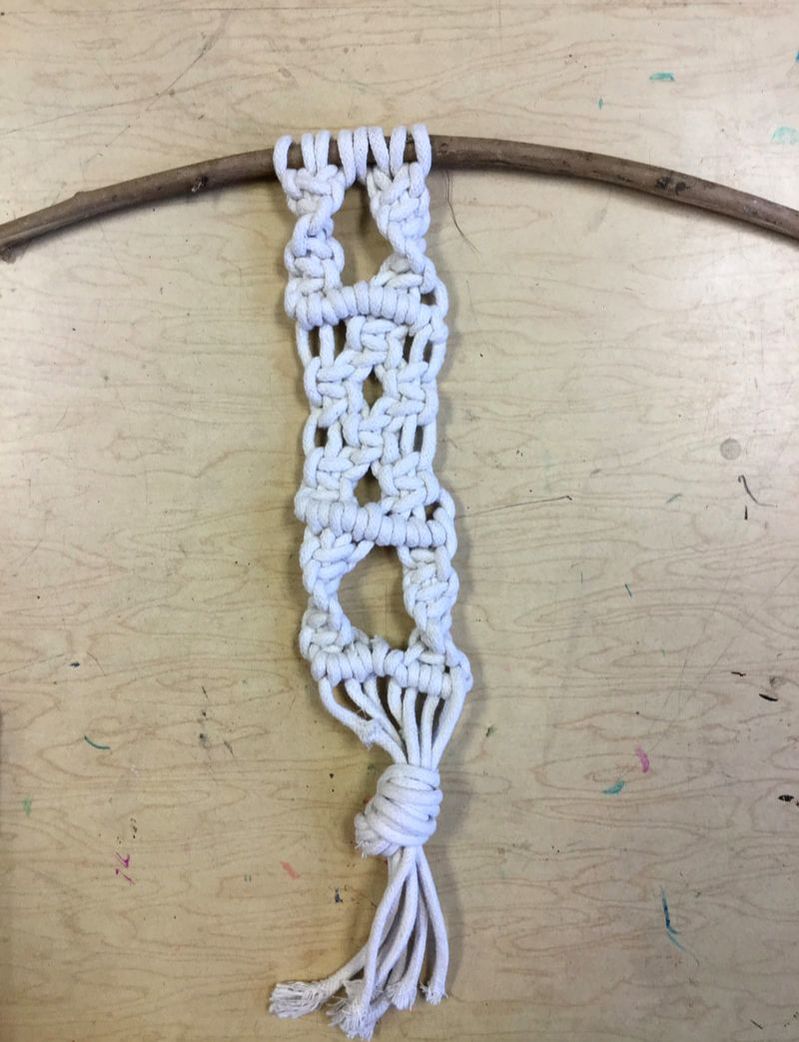
For my macrame I made a wall hanging piece. The wall hanging is made up of the square knot, lark’s head knot, spiral knot, and the double half hitch knot. The main idea behind my artwork was to show that I learned something over the period of time I had to study this topic. My goals for the artwork I made, and this entire study, were to make the different knots look unique.
|
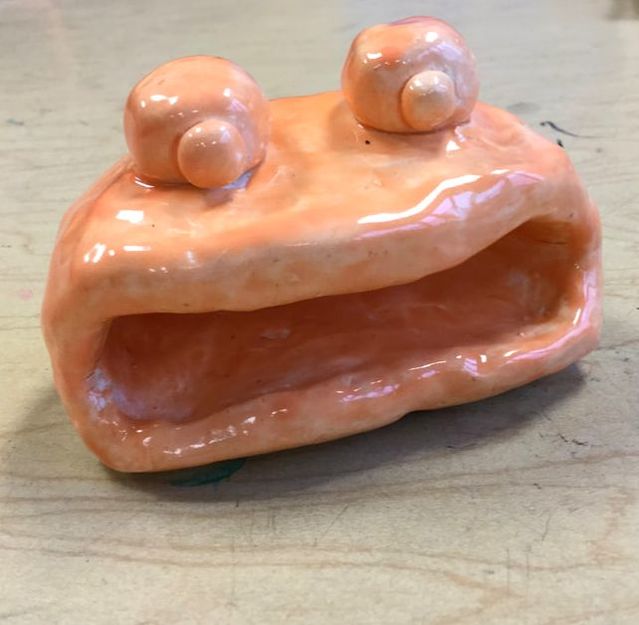
My independant piece is a clay monster. It took me about four class periods to make it; the first day I formed the monster from clay, I started off how you would normally make a bowl or pot. For the glaze I used the color Creme Cicle. The goals I had for this piece of art were to reflect the things I learned throughout the course of this class. The biggest struggle I faced was making the glaze even so that when it came out of the kiln it wouldn’t look splotchy.
|
Wade
Hi! In this semi-short document I’ll be talking mainly about the art of another human who is definitely not me due to a series of tragic and woeful events. (namely the size and integrity of metal spiders) First, I’ll talk about the aforementioned other human and what she made.
Masterwork.
My Masterwork is called Maman. In french this means something along the lines of ‘Mommy’ or ‘Mama’. Maman is—to put it extremely simply—a spider. Maman measures about 30 feet tall, and 33 feet wide, and has 8 legs like a real spider. While similar in several aspects Maman differs in body shape in several key places from a real spider. Its body-shape is vaguely cylindrical with a band around the center and a lumpy cone on the top. One of the main features of the sculpture is a bumpy, irregular sac made of metal beams and mesh. The sac is filled with gray and white stone eggs. Unlike a real spider, Maman’s legs curve up sharply and then go straight down and taper off to points. I made two and a half copies of Maman. My copies varied from the originals somewhat. Most of the legs are less sharp and one and a half of the spiders only had five or four legs. My spiders also don’t have the little mound on the top and the legs come out of the egg sac instead of a little smooth area. Only one of my spiders has mesh in the egg sac. My first spider is made out of weak, thin, silver wire. It is–in my opinion–the best spider. It only has five legs. While a semi-inaccurate reproduction of the original, I like it the best because–again in my opinion–it looks the coolest. My second spider was made out of much, much stronger coat-hanger wire. The wire is bronze and about a bazillion times harder to bend than the first kind.
Ilana
For the first quarter I had 3D art. I’ll mostly just be writing about my masterwork, I didn’t do any independent work for 3D because I have 2D as well and it would be too much work.
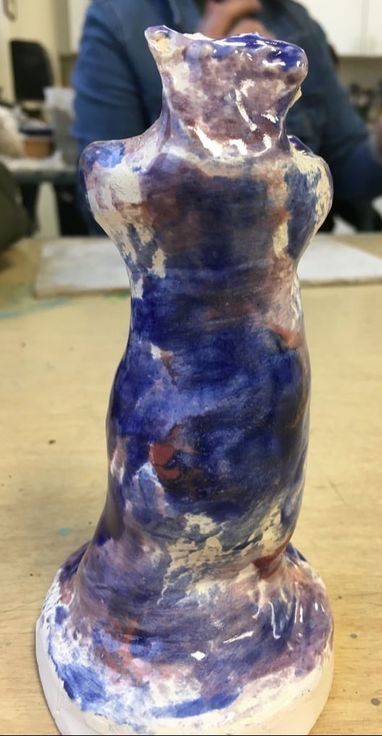
I am making a piece called ‘Love’ by Alexander Milov. It is 2 clay babies trapped inside wire adult bodies that are positioned in a way that makes them look sad or depressed. The adults are faced away from each other, and the babies appear to be trying to get to each other from inside the adults. Alexander Milov said the babies glow and shine at night when it gets dark. That’s my master work.
I made the baby using clay, I haven’t made the rest yet.
I think personally the big idea is that the adult’s inner child or inner happiness or just the lack of happiness; the thought of how happy they once were, and/or their childhood (which maybe they miss) are trapped inside of their adult life and just life in general and the stuff it brings (like I said the adults look super depressed etc.) and the babies wanna get out.
My goals for this was to just do it and make it look like the original, and make it look nice and how I want it.
My overall thoughts are that it’s really hard to make, but I really like it regardless even if I can’t pull it off. I also wonder what Alexander Milov originally had in mind for the meaning of it.
So yeah that is what I have done this quarter, and it is also my masterwork, and I’ve had fun (besides the struggling) trying to make it.
Ava L.
|
This quarter, I was in both art classes, 2-D and 3-D. I definitely found 3-D a lot more challenging, and I was less happy with my 3-D art. I thought the class was very fun, I just need to practice 3-D art more often. I also found the projects more time-consuming, but that might just be that we actually had less time. Either way, 3-D art is definitely something I will be doing more after this class.
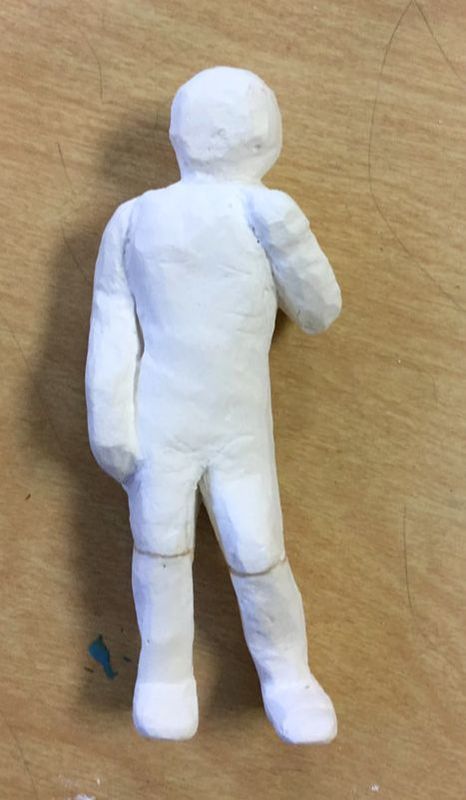
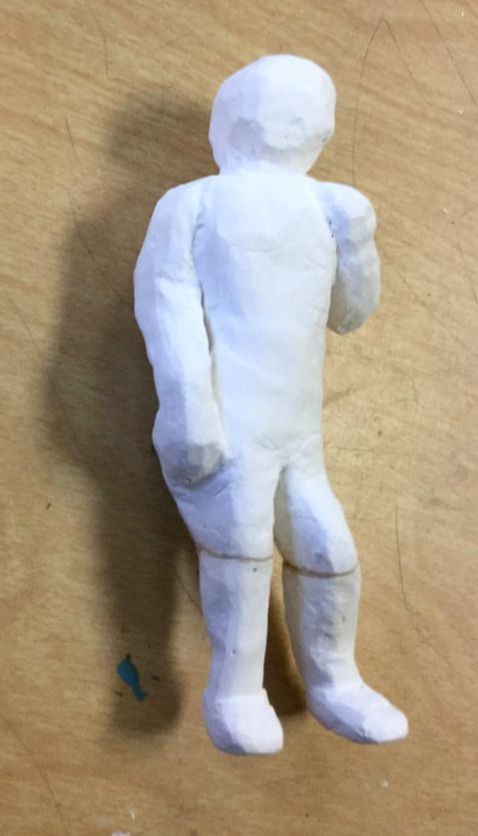
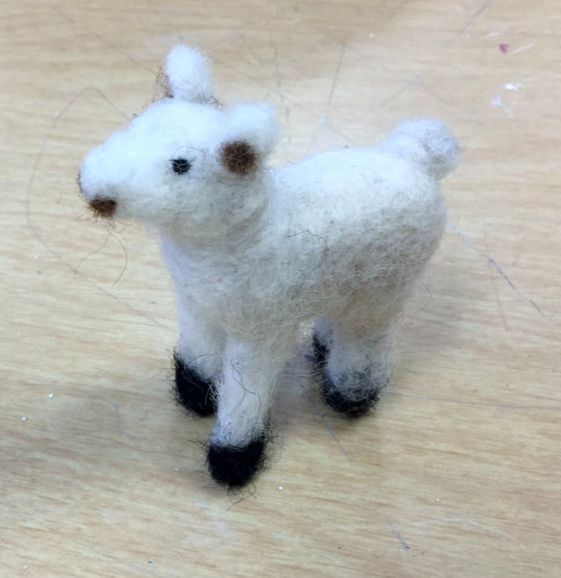
For my masterwork, I attempted to recreate The Statue of David, by Michelangelo. Overall, I’m not very happy with the way my piece turned out. I realized it was a lot more difficult to portray detail when carving from the plaster, and that kind of explains his lack of clarity… and face. Michelangelo starting carving David in 1501, and finished in 1504. You can see this sculpture for yourself in the Galleria Dell’Accademia, in Florence. David stands 17 feet tall, and is carved from a solid block of marble. Originally, an artist named Agostino was hired to sculpt David out of the marble. Agostino had only begun to shape his legs, when he quit the project. Another artist, Rossellino was hired to take over for Agostino, but he was fired as well, without making any significant progress. At last, 26 year old Michelangelo was hired to complete the statue, and that he did. For my first independent piece, I knitted a piece to be used in yarnbombing. Sometimes considered a type of Guerrilla art or graffiti, is when you knit something ahead of time, that can later be added to something else. You usually see it with trees, like when someone will knit a large rectangle, and then later, will wrap it around a tree. Some people will even do the same with thing with famous sculptures. I have already knitted the rectangle, and I plan to wrap it around a tree on the playground. I think yarnbombing is super cool and original, as it’s almost like an easily removable, friendly form of graffiti. Also, now I can finally put my knitting to use, instead of just trying to figure out how to pearl for hours. For my second independent piece, I needle felted a tiny sheep. I’ve always enjoyed needle felting, and thought it was super cool. I wanted to make a sheep, because you use real sheep’s wool to felt. I thought it would be pretty unique to felt a sheep out of sheep hair. You needle felt basically by stabbing a piece of wool over and over again with a needle. The needle has tiny barbs, and this rips up the wool and compresses it down. I felted the body first, because it was the largest, and the easiest shape to felt. I then worked on the legs, and finished with the head. So yes, I definitely learned that I need a lot more practice with 3-D art. I don’t necessarily think that any of my 3-D art turned out particularly well. I think that I would need to try and recreate David about 10 more times before it’d even be recognizable. He was absolutely more difficult that I was expecting. Although I didn’t like the way my art turned out, I really did have fun, and thought of this as just more practice for 3-D art, and more of a reason to try and improve. 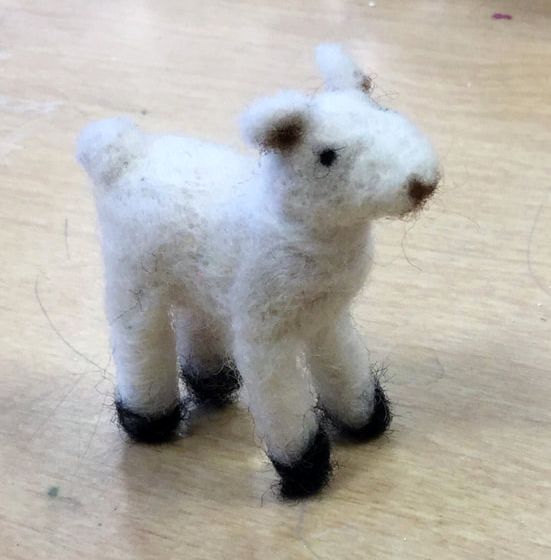
|
|
Nadya
My art project in 3-D art was to re-create a sculpture called Magma. I did not do an independent piece, due to the lack of time. I probably could have done one, but I chose to make Magma extra excellent instead.
Magma, created by Mark di Suvero is a magnificent sculpture. It is made out of giant steel beams, each one weighing up to 40,000 pounds. It is 25 feet tall and 48 feet wide. Magma is currently in San Francisco. The artist, Mark di Suvero was born in Shanghai, China in 1933. Finished in 2008, Magma is an interesting piece: the G-shaped curl that sits on the cross beam moves from side to side, with no fixed position.
My artwork is a model of Mark di Suvero’s giant sculpture, Magma. It is a one by three foot sculpture made out of cardboard, hot glue, and acrylic paint. I made my masterwork by looking at a picture of Magma, cutting up the pieces, and glueing them together in the right spots. When I looked at Magma for the first time, I was fascinated by the complexity of it and I knew that I had to try to make it. Since I didn’t make an independent piece, my goal as an artist is to make my own artwork some time in the near future. During this project I learned a lot about art. First, I learned about how to correctly use an x-acto knife, and I perfected my technique throughout the project. Second, I learned about the best way to attach cardboard pieces together with hot glue. I also learned a lot about the original Magma. I had a very positive experience working on Magma.
In all, I really enjoyed working on this piece. I think it really helped me with appreciating art and with studying the art. Now, when I look at a piece of art I think about how to re-create it.
Gillian P.
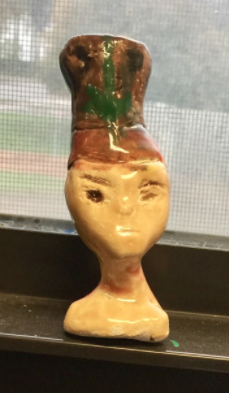
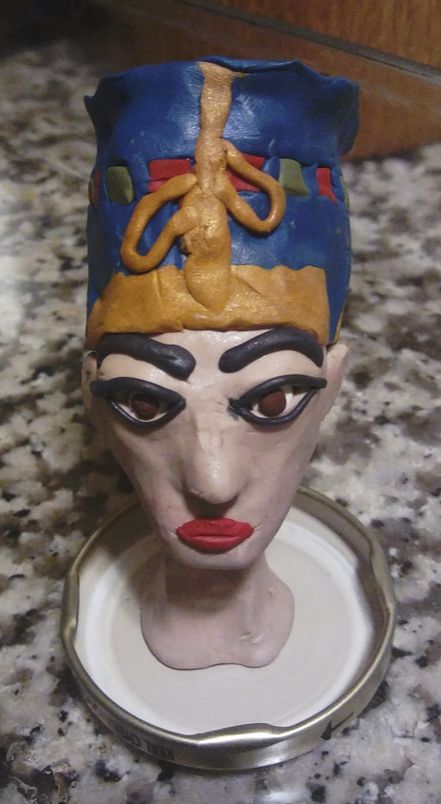
In this quarter I recreated a sculpture of the bust of ancient Egypt queen Nefrititi. I decided to do this because clay and glaze interest me.
The bust of Nefrititi was made in 1345 B.C. by the sculptor Thutmose. It was found in his workshop in Amarma Egypt in 1912. Now it’s on display in the Nues museum in Germany. The sculpture was made out of limestone and stucco and is 19 inches tall. The artwork I recreated is about two inches tall and made of clay. I glazed over it with a variety of colors. I created this art with a block of clay that I molded into a head shape and then carved facial features and hat adornments into it. When that was done I put it in the kiln and when it came out I glazed it. Then it was put in the kiln for a second time.
The idea behind this work was to as accurately as possible recreate Thutmose’s sculpture. My goals were to have it looking put together by the end of the quarter completely glazed and finished. I succeeded.
My overall thoughts are that I should have done better with time management. I only just finished the project. In the end, I think it turned out okay.
Stella
|
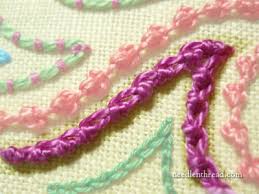
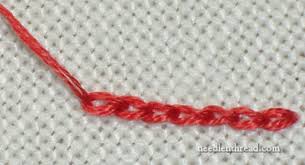
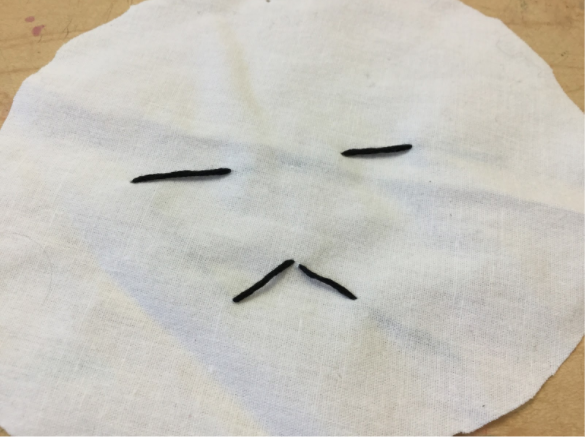
For this 3D art class I focused on embroidery. I learned how to embroider when I was seven or eight but I didn't know that much and I thought it would be fun to learn again and maybe make some patches to put on a jacket. I learned several stitches, the ones I used most were a chain stitch, back stitch and a satin stitch.
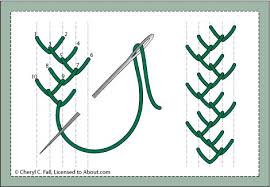
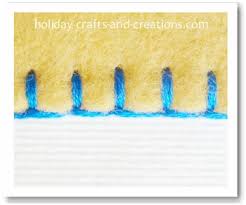
Embroidery has been around for a very long time. It has been found all over the world and has been utilised by Native Americans, Chinese and even people in Sweden. According to Greek mythology, the goddess Athena passed the skill of embroidery, along with weaving, down to humans. There are many different kinds of stitches, the easiest being a running stitch/straight stitch and a blanket stitch. The most complicated are probably the feather stitch and the herringbone stitch. |
|

|
For my first project I made Boozy, the ghost logo of FrnkIero and the Patience and Frank Iero and the Cellabration. This was a very simple design using only one color of thread and one type of stitch. I chose to make this logo because I love Frank and his band and it means a lot to me because I met some of my best friends through music and bands like Frank’s. Also this seemed like an easy project for my first. It didn't require that much effort and used skills I already had. I made it out of an old sheet and black embroidery thread in a chain stitch.
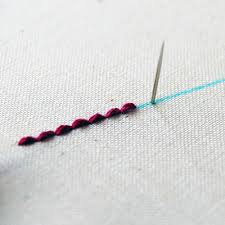
For my second project I chose to do another thing related to Frank Iero, his halloween tattoos. Frank has the word halloween spelled out on his fingers and I have always liked how it looks, plus, halloween is my favorite holiday. This project was a lot harder and took a lot longer than the first. I used a sheet again and thread in the colors black, red, dark red, orange and yellow. The stitches used were a backstitch and a satin stitch. |
Unfortunately, I did not finish my this project by the end of the nine weeks. I honestly did not realize how short those weeks were, keep track of your time kids! I will finish this work soon and I am pretty excited to see how it turns out.
Marley
Fiona
This is the course conclusion for my elective, first quarter 3-D art. I made two pieces, a masterwork and an independent piece. I learned a lot from both of them, and will go over them here.
My masterwork was “horses” by Deborah Butterfield. I was surprised to learn that it was not, in fact, one sculpture, but a series of sculptures of horses. Seeing as it was a lot of sculptures, and not just one, I decided to make a piece just based on her style. However, her method was to sculpt the horses from driftwood then cast them in bronze. I couldn’t exactly replicate that, so I went with the next closest medium, sticks. I sculpted a horse using plain sticks and hot glue. The sticks were just gathered from my back yard, so they weren’t the best quality and some of them broke. However, a made a pretty decent representation of Deborah Butterfield’s style.
My independant piece is an origami crane, only made out of clay. I made it by mostly copying a crane I had folded from actual paper. I thought it would be interesting to replicate one medium with another. I had hoped to make a crane that looked fairly accurately like it was folded from paper, but though it started out well, it didn’t turn out as well as I hoped. The crane broke several times and looked kind of lumpy.
Still, I feel like I have learned a good deal about 3-dimensional art and am looking forwards to doing more.
Allison
|
|
For 3-D art class this quarter my study was macrame. Macrame is basically something you make with a series of knots I very much enjoy it and I thought you would like to learn about my project.
How to describe my artwork.
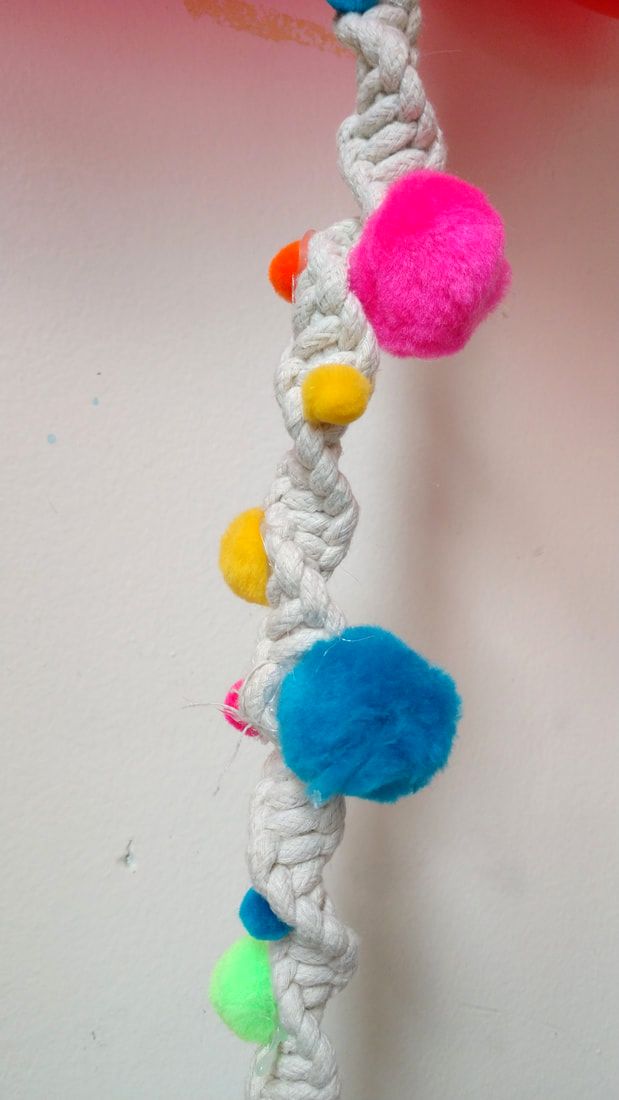
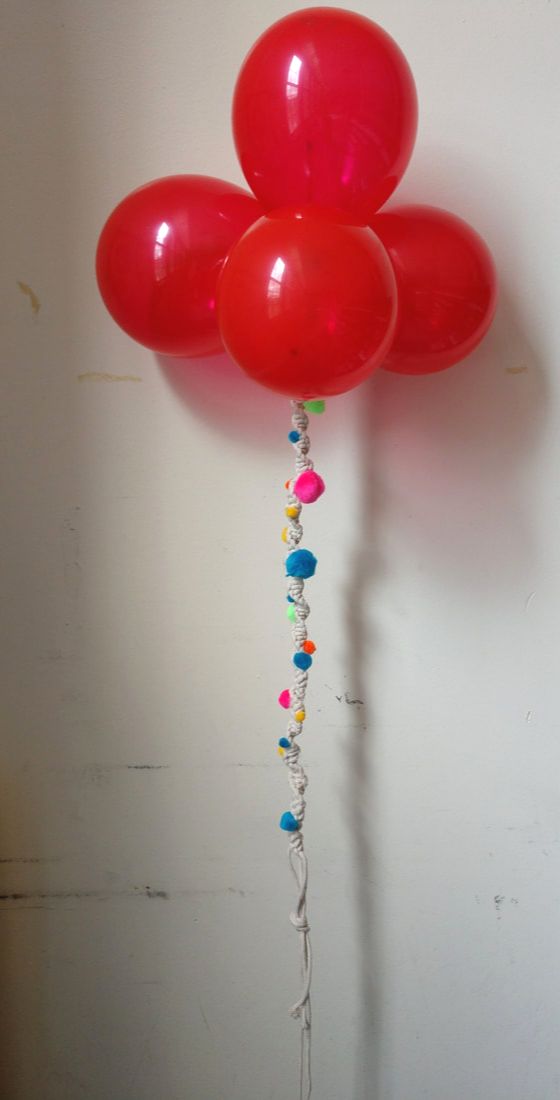
My artwork is like if macrame went to a party. There red balloons at the top and on my macrame I added pom poms!
How did I create it?
Well I started with a two and a half foot piece of spiral knot macrame and then I added multi colored pom poms for two reasons one Is because I thought it would look cool,And 2. it's because I had a couple of mistakes making it that I wanted covered up. Then I was feeling really party like so I added red balloons at the top.
What's the big idea?
The big idea behind this piece was really 2 things 1: When people looked at this piece I wanted them to feel Joy or happiness. And the second reason that came to mind was because I added the balloons I thought I kind of look like those things that hold down helium balloons so yeah that's how I created my art.
Goals.
My goals as a junior artist are big and small really I want to explore everything from clay to oil paints. but that's one of my bigger goals, I also have smaller goals like I would like to learn how to draw People better you know like making their hands not look like gloves and other stuff like that. one thing that this project helped me reach was I got to explore something new I didn't even know macrame existed before I started this project.
My thoughts
In this art piece my goals were reached and I had a lot of fun making this some things I wish I could have done better is the neatness of the knots I created, And I wish I could have made this piece longer.
Thank you for taking the time to read my essay I hope you enjoyed it.
How to describe my artwork.
My artwork is like if macrame went to a party. There red balloons at the top and on my macrame I added pom poms!
How did I create it?
Well I started with a two and a half foot piece of spiral knot macrame and then I added multi colored pom poms for two reasons one Is because I thought it would look cool,And 2. it's because I had a couple of mistakes making it that I wanted covered up. Then I was feeling really party like so I added red balloons at the top.
What's the big idea?
The big idea behind this piece was really 2 things 1: When people looked at this piece I wanted them to feel Joy or happiness. And the second reason that came to mind was because I added the balloons I thought I kind of look like those things that hold down helium balloons so yeah that's how I created my art.
Goals.
My goals as a junior artist are big and small really I want to explore everything from clay to oil paints. but that's one of my bigger goals, I also have smaller goals like I would like to learn how to draw People better you know like making their hands not look like gloves and other stuff like that. one thing that this project helped me reach was I got to explore something new I didn't even know macrame existed before I started this project.
My thoughts
In this art piece my goals were reached and I had a lot of fun making this some things I wish I could have done better is the neatness of the knots I created, And I wish I could have made this piece longer.
Thank you for taking the time to read my essay I hope you enjoyed it.
|
|
|
Sawyer
I this quarter, I a majority of my time on my masterwork, and spent a few days tinkering with my indie. My masterwork is a soundsuit (one of many) by Nick cave. my indie is an electronic mess that some may consider a robot.
|
Masterwork: my project is Nick Cave’s “The Stranger” Soundsuit. It is one of many siblings it but no others are exactly alike. It is made of fabric that houses a person. The suits are performed in front of a camera, or live audience. They make sounds when they move. Nick Cave was born on February 4, 1959 in Fulton Missouri. Often times when performing, Nick himself gets in the costumes and dances around. I made mine out of a simple wire frame by twisting wire into curved tubes for arms, and tried to make the general shape of the actual suit. I covered it in several layers of paper maché. I quickly found out that my wire frame had way too little wires and most of my support is in the paper. I made sure to leave a small hole to put in beads so that it would make sounds when it moves. Then I painted it. I tried to make the triangles on the real suit but wound up making too many small blotches of paint. This was the point I thought was “the dark night of the soul” part of my project. On the other side I made the blotches much bigger and I think it looks better. For the legs, I copied the pattern as best I could.
|
|
Indie: My project is called “Determination” and (as stated earlier) was a robot that I strategically destroyed. On top, I used a hammer to crack the blue head, then used the back end to make holes. I pried off one of the antenna with the hammer and began to beat it some more. I began to beat and pry off the neck. Once slightly displaced, I broke off an arm and shoved it through a hole in it’s chest that I made earlier. Then I made another hole on the other side of its chest. I scratched the arms with a screwdriver. After the demolition was complete I took It into school on saturday. I painted the areas around the holes brown. The robot cannot bleed so I the brown is oil. I pulled out the circuit board and cut almost all of the wires. I hot glued that so it would stay outside of the robot. I took the severed leg and hot glued a piece of that into its hand to use as a cane. I took some wires from the back of its head and cut those too. There’s a reason my project is called determination. I collected many parts of the robot and put them in a pile. The robot needs to get to the pile to fix itself. It could easily topple over and call it quits but it will not. Never take the easy way out.
My projects were both very fun and I do feel that I learned a lot about how to do art (and maybe a little destruction too). I learned a bit more about amazing sculptures that I never knew existed. I learned how to do paper maché sculptures, and much more. Thanks to Deb for allowing me to use some of my time to have fun, and make art.
My projects were both very fun and I do feel that I learned a lot about how to do art (and maybe a little destruction too). I learned a bit more about amazing sculptures that I never knew existed. I learned how to do paper maché sculptures, and much more. Thanks to Deb for allowing me to use some of my time to have fun, and make art.
Ava T.
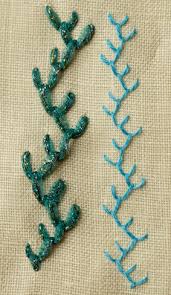
One day, I thought to myself, “What would it be like if I combined weaving with embroidery?” Bam. Embroiderweaving.
The most recent piece I made called the ‘ant finger carpet’, is made up of four ( once five) blue strings spaced apart. I wove several colored strings through and tied them at the end. To hold it all together, I stitched it with white thread. I then -great idea- cut the entire piece out. Honestly, I am surprised it held together this long.
Embroidery derived from stitching as it probably was recognized as a rather cool bit of art. The fascinating fact is that is is quite difficult to discern an old piece of embroidery from a modern one. There is no chance of style or materials whatsoever.
I owe my considerable progress of embroidery to my grandma and a classmate. They taught me how to actually use a needle as I would have ended up with very bloody fingers.
|
|
Mark
|
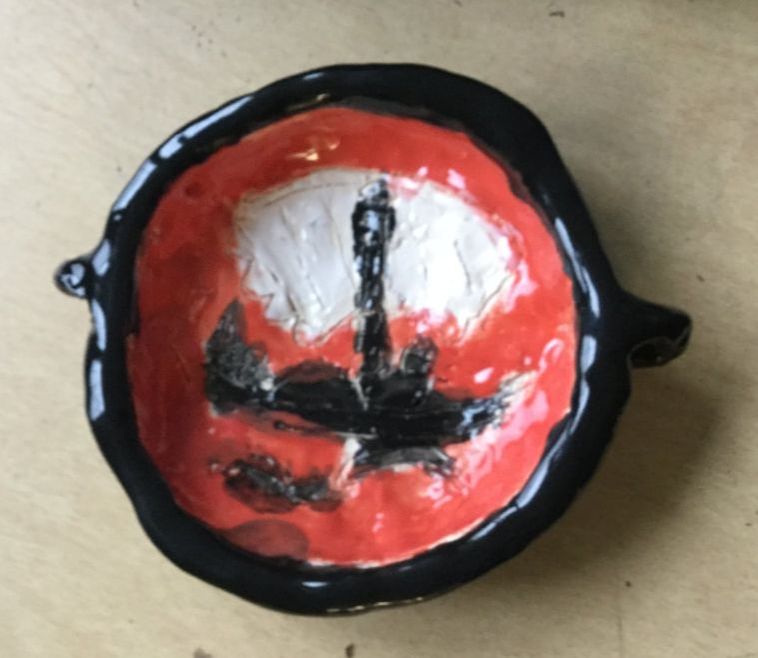
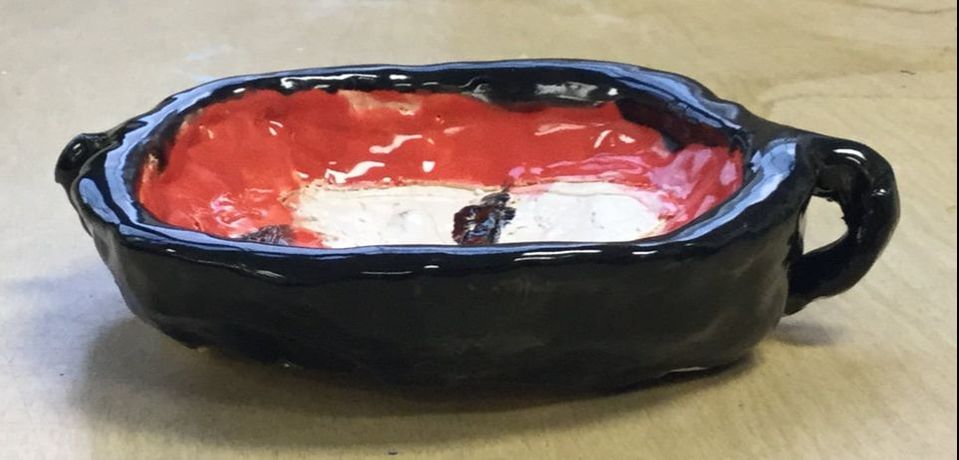
For my masterwork project I made a small replica of the Dionysus Cup out of clay.
The Dionysus Cup is a piece made by the Ancient Greeks dating back to 530-540 BC. It is one of the masterpieces of Exekias and one of the most significant works in the Staatliche Antikensammlungen in Munich, Germany. It is 13.6 cm and has a diameter of 30.5 cm. It is made of only a few large shreds. The image on the inside of the cup called the Tondo takes up almost the entire interior of the cup.
|
|
My replica of the cup is small. I made the cup out of clay and used glaze for the middle and sides of the cup. The Ancient Greeks inspired my artwork. My goals for this piece were to make a replica of the cup. I am happy with my artwork. I have also learned a lot about my masterwork.
|
|
During this class I was able to complete a masterwork project. In this class I learned a lot about my masterwork project and art in general. Overall, I enjoyed and thought that this art class went well.
Madeleine
|
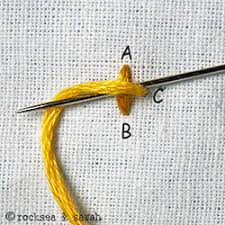
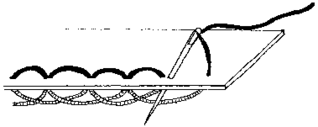
Instead of doing a masterwork, I learned more about embroidery. During this quarter, I learned three basic stitches, and my work was mostly composed of them. They were the running stitch, the backstitch, and the blanket stitch. I learned while embroidering that you should leave extra slack for yourself in case you need it later on, and that you have to remember which direction you are coming from (bottom or top) while doing the running stitch, because I did that multiple times.
My embroidery artwork was white fabric, and I embroidered a rainbow and two fluffy clouds on it. I’m pretty happy with the way it turned out, especially because it was my first time embroidering. I was going to make a whole pillow out of it and embroider the other side too, but I ran out of time in the quarter, so I ended it there. For my second thing, I learned how to do the square knot in macrame. It took a few times watching Julia do it until I got it, but it turned out pretty good. I learned while doing this that the side that the bump is on is the side that the four should go on for the next knot. I liked how you could just take out the knot if it was bad. I was happy with the way it turned out. 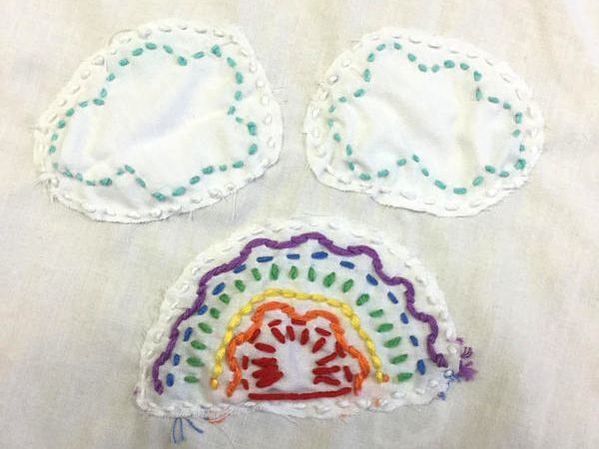
|
|
Jake
I tried to make a clay car. I modeled it off the boss 302 mustang. I started making it by making the front. I just made the general look of the car. Then I made the doors and moved on to the rear. The rear was harder than the front because because I had to attach it. Then I engraved the horse on the front and the rear lights. Then I added the roof? What inspired me to do this is my dad has this car and he loves it. I thought I could try to replicate it and give it to him. The goals I had when planning to do this was to get better with clay and to face the challenges of making something very hard.
|
|
|
My overall thought of this artwork is strange. I think it is bad but I know I couldn't have done much better.
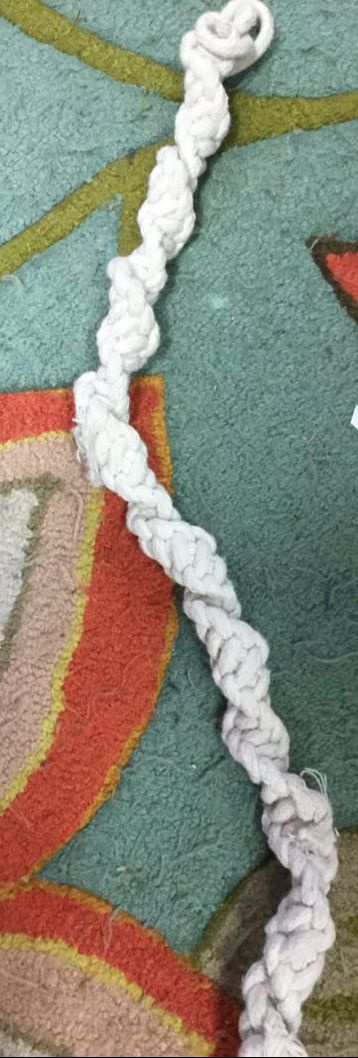
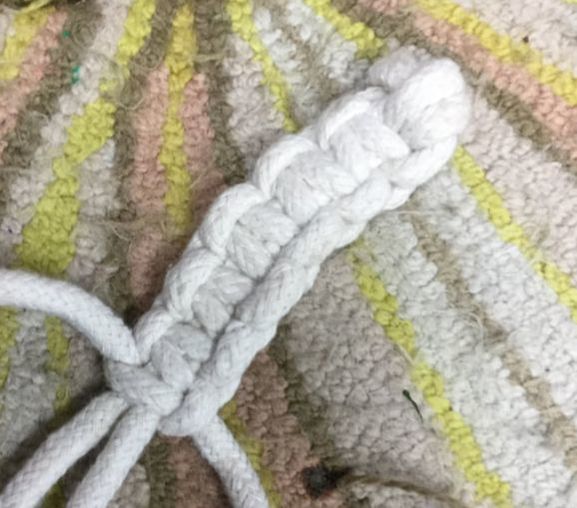
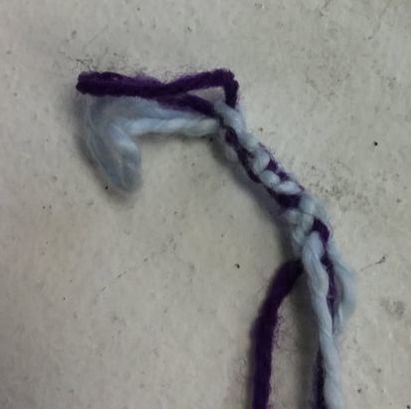
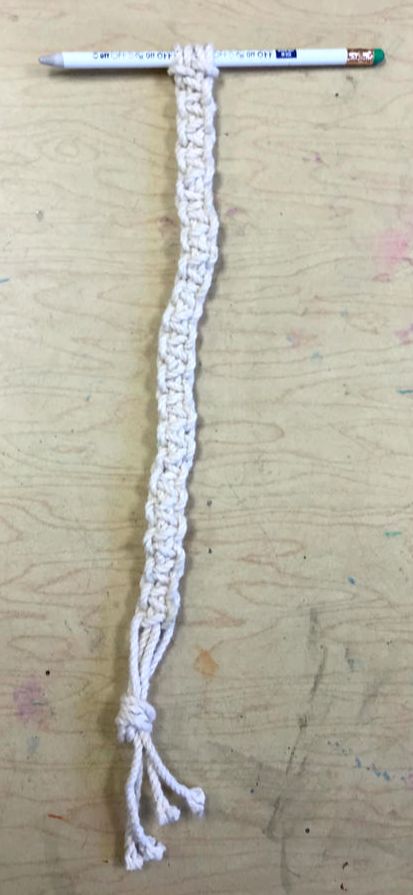
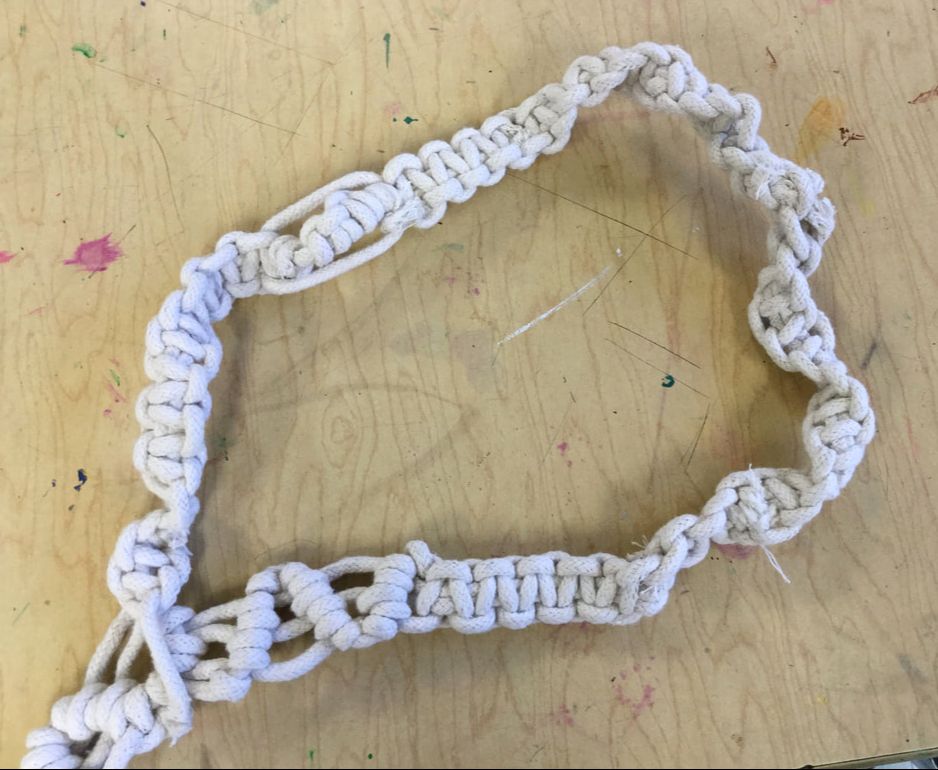
Macrame originated in the 13th century by Arab weavers. They made things like bath towels and veils. To study this was my masterwork. I came into macrame knowing nothing about it. I learned three different knots and my masterwork was a combination of all three and a little bit of a made up knot. It looks similar to a necklace but bigger. I started it on a pencil but took the pencil out and replaced it with the end of the string. I also learned how to add more string to the end of your work. You hot glue the two ends. It doesn't look very good but works.
Macrame originated in the 13th century by Arab weavers. They made things like bath towels and veils. To study this was my masterwork. I came into macrame knowing nothing about it. I learned three different knots and my masterwork was a combination of all three and a little bit of a made up knot. It looks similar to a necklace but bigger. I started it on a pencil but took the pencil out and replaced it with the end of the string. I also learned how to add more string to the end of your work. You hot glue the two ends. It doesn't look very good but works.
Brandon
|
|
|
